Monday, October 28, 2013

no bake pumpkin tarts

SONY DSC
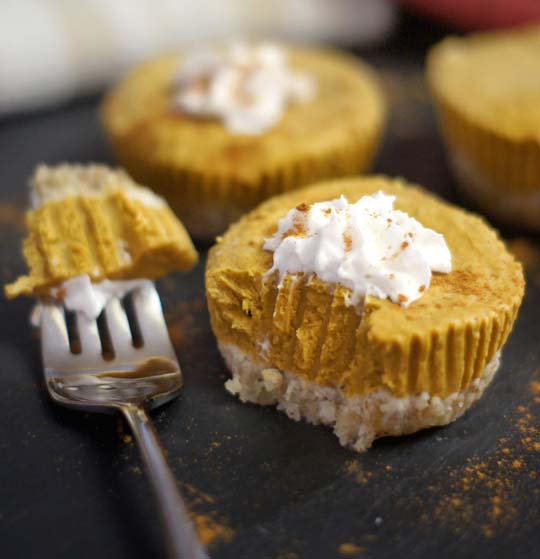
No-Bake Pumpkin Tarts (Vegan, Paleo)
Author: 
Prep time: 
Cook time: 
Total time: 

Serves: 8
 

Quick and easy mini pumpkin pies, with no need for an oven!
Ingredients
For the crust:
  • 1 cup walnuts
  • ¼ cup shredded coconut
  • 2 tablespoons maple syrup
  • 1 tablespoon coconut oil, melted
  • ¼ teaspoon salt
For the filling:
  • 1 cup pumpkin puree
  • ¼ cup almond milk
  • ¼ cup coconut oil, melted
  • ¾ cup Medjool dates, pitted
  • 1 teaspoon vanilla
  • 1 teaspoon cinnamon
  • ¼ teaspoon ground ginger
  • ⅛ teaspoon ground cloves

Instructions
  1. Line a standard muffin tin with 8 parchment cups, and set aside.
  2. To prepare the crust, pulse the walnuts and shredded coconut in a small food processor until ground into a fine meal. (Be careful not to over-process, or you’ll wind up with nut butter instead!) Add the maple syrup, coconut oil and salt and process again until just mixed, and the dough sticks together when pinched between your fingers. Scoop the dough by heaping tablespoons into the 8 parchment cups and use your fingers to press down and form a crust for each cup. Place the pan in the fridge to set while you prepare the filling.
  3. To prepare the filling, simply combine all of the ingredients in a blender, and blend until completely smooth and creamy. (If your dates aren’t soft enough to blend easily, soak them in warm water for 10 minutes beforehand.) Remove the pan of crusts from the fridge, and pour the batter evenly into the 8 cups. Smooth the top, then return to the fridge to set completely, about 4-6 hours.
  4. When the center of the filling is firm to the touch, the tarts are ready to serve!

Saturday, August 24, 2013

Oven baked fries/baked potato

Baked Potato Meets Oven Fries

Once you eat a Hasselback potato, you'll wonder why you waited so long to try it. The increased surface area exposed to the oven's heat means you get lots of crispy edges, while the base of each slice still holds soft, tender flesh. It's a delicious effect that's easy to create: Cut most of the way through a potato at 1/8-inch intervals so that it looks like an accordion. A handy trick: Line up chopsticks or butter knives on both sides at the base of the tater; they'll stop the knife from going all the way through. Combine some olive oil, sea salt, pepper, herbs, and garlic, and brush over the potato, making sure the oil seeps between slices. Bake, uncovered, at 450° for 45 minutes to an hour, depending on the size and type of potato. Sprinkle with more fresh herbs.

Tuesday, July 23, 2013

kale chips

Nacho Kale Chips. Photo by Serah B.

1/2 Photos of Nacho Kale Chips
morephotos

Total Time:

Prep Time:
Cook Time:

35 mins

5 mins
30 mins

Serah B.'s Note:

These are uber kid-friendly. It's a great way to get extra vitamins (especially B-12 from the nutritional yeast) and protein (cashews, ...
SAVE THIS RECIPE TO:
  • Cookbook
    Save this recipe in your online cookbook to access when you need it.
  • Menu
    Create a new menu and save this recipe for easy meal planning.
  • Meal Planner
    Add this recipe to a weekly meal plan.
  • Shopping List

    My Shopping List

    Add this recipe's ingredients to your weekly shopping list.
Manage this recipe:
  • Add a Private Note

    Add Private Note

    ONLY YOU see your private notes, and they print with the recipe.
    You have characters remaining.
    Note pairing ideas, substitutions and more - only you can see it!
  • Submit a Correction
    Spot a typo or missing ingredient? Submit your correction for review.
  • Ask a Question
    Get answers about this recipe in our Cooking Q&A forum.
Share This Recipe:

Ingredients:

Servings:
4

Units: US | Metric

Directions:

  1. 1
    Remove hard stalks from kale and set aside in a mixing bowl.
  2. 2
    Add remaining ingredients to blender and process until smooth, adding a little bit of water or more lemon juice if needed.
  3. 3
    Pour sauce over kale and mix until evenly coated.
  4. 4
    Lay out on parchment paper and dehydrate on low for about 10 hours, turning over halfway through--OR bake at 300F for 30 minutes, flipping over walkway through

chick pea snacks!

Servings: 2 (as snack) Prep Time: 5 Cook Time: 30
roasted-chickpeas-garbanzo-beans-3154-2.jpg
I highly recommend doubling a batch of Roasted Chickpeas, the bowl will be empty in 10 minutes! This is a one of the simplest snack recipes - four ingredients and it starts with a can of chickpeas pulled from your pantry. You can use any spice blend - I'm really enjoying Creole or Cajun seasoning, but don't limit yourself there! At the end of the post, I have a list of spice/fresh herb combinations that you can use.

Ingredients:

One 15-ounce can garbanzo beans1 1/2 tablespoons olive oilSaltSpice blend of your choice

Directions:

1. Preheat oven to 400F.
2. Drain the can of garbanzo beans in a strainer and rinse with water for a few seconds to clean off the beans. Shake and tap the strainer to rid of excess water. Lay paper towl on a baking sheet, and spread the beans over. Use another paper towel to gently press and absorb the water on the beans. Roll the beans around with the paper towel to also remove the thin skin from any of the beans. Discard the skins and the paper towels.
3. Drizzle the olive oil over the beans and use your hands or a spatula to toss around and coat. Roast for 30-40 minutes until the beans are a deep golden brown and crunchy. Make sure that the beans do not burn.
4. Season with salt and spice blend

Monday, July 22, 2013

hypothyroidism what not to eat

Hypothyroidism is a condition in which your thyroid is not making enough thyroid hormone, specifically triiodothyronine (T3) and thyroxine (T4). While a lot of people might not see symptoms in the earlier stages, this condition can lead to obesity, joint pain, infertility and heart disease. You can very accurately take a thyroid function test to see the sate your thyroid is in.
hyperthyroidism
There are hormone replacements that can help with your condition if needed, but we here at fitlife.tv are all about helping you and your body naturally. Through juicing and avoiding certain foods, which I will go over in a minute, you can learn to prevent the progression of Hypothyroidism while trying to heal your thyroid naturally.
Foods to Avoid
Before going into the specific foods to avoid, you’d probably like to know why it is why have to avoid certain foods at all (I know I would).
Some foods contain what are known as Goitrogens. Goitrogens inhibit iodine metabolism in your body. So why is this important? Your body uses iodine to produce important thyroid hormones. If you are consuming a lot of Goitrogens, thyroid hormone is inhibited, which is bad for someone that already has trouble producing these hormones through Hypothyroidism.
Note: If you DO NOT have Hypothyroidism, it is perfectly safe to consume most of these foods that contain Goitrogens. A lot of these foods are still extremely healthy and provide many benefits to you and your body. This is a list of foods that will further contribute to Hypothyroidism and should be avoided by people that already suffer from this condition.
Okay, so let’s get down to the Goitrogen-containing foods you want to avoid:
1. Vegetables – Broccoli, Cabbage, Brussels Sprouts, Cauliflower, Kale, Spinach, Turnips, Millet, and Mustard Greens.
2. Nuts and Beans – Soybeans, Peanuts, Linseed, and Pine Nuts.
3. Fruits – Strawberries and Peaches.
There are other foods out there that contain Goitrogens so make sure you educate yourself if you plan on trying to naturally heal your thyroid. It is also important to note that some foods are fine to eat as long as it is in moderation.
One of the foods you want to always avoid is SOY. Soy is extremely high in Goitrogens and is featured in one form or another in many foods so be careful and always look at the ingredients for anything you plan on putting into your body.
AvoidFoods-HT-JuiceandEat-2
Cooking is King!
Research has shown that cooking foods helps take out the Goitrogens, making it safer to eat for someone with Hypothyroidism. So if you just have to have some of those veggies, remember, limit your consumption and always cook them to eliminate most of the Goitrogens.
What to Juice and Eat for Hypothyroidism
The most important thing you want to do is not juice Goitrogen-containing foods since they are still in a raw state. However, don’t start freaking out just yet! There are plenty of substitutes that you can safely juice and eat that will not contribute to your condition.
Here is a list of some foods that you can safely juice and eat:
Beetroot
Beetroot Leaves
Chard
Celery Leaves
Romaine
Zucchini
Cucumber
Grapefruit
Lemon
Limes
Oranges
Watermelon
There are plenty of other options available, so please make sure to do your research!

Saturday, July 20, 2013

Healthy dish with buckwheat and lentils

ingredients
...
1/2 cup of organic buckwheat
1/2 cup of mixed organic lentils
1 whole organic portobello mushroom
1 medium organic yam
hand full of organic Swiss chard or kale
1 organic avocado
1 organic heirloom tomato

seasonings:

1/2 tsp of turmeric
1/2 tsp of cumin
1 whole organic lemon
1/4 tsp of fresh ground organic black pepper

Rinse the buckwheat and lentils and place it in a pot. Add three cups of water and bring the buckwheat and the lentils to a boil and reduce immediately, to a simmer. Cut the Portobello mushroom and peeled yam into bite size pieces and place that in the pot. Shred the Swiss chard or kale and place that in the pot too. Add the seasonings and reduce to a simmer for fifteen minutes.

When the stew is done allow it to sit in the pot for ten minutes or so. Place the stew in a bowl, squeeze fresh lemon juice on top, add the diced tomato and the whole avocado.

This breakfast covers all the bases of nutrition - calcium, protein, enzymes, fiber, antioxidants, healthy fat, vitamins, minerals.... The value of a healthy meal like buckwheat and lentils and the vegetables and fruit eaten together drastically lowers cholesterol and blood pressure and enhances every organ in our body as well as our skin, muscle tone and mental clarity.

Friday, July 19, 2013

coconut curry

Print
Easy Coconut Curry
Author: 
Prep time: 
Total time: 

Serves: 2-4
 

An easy curry dish that’s quicker to prepare than ordering take-out!
Ingredients
For the sauce:
  • 1 teaspoon coconut oil
  • ½ yellow onion, chopped
  • 2 cloves garlic, minced
  • 1½ to 2 tablespoons curry powder
  • 1 (13.5 oz.) can coconut milk*
  • 1 tablespoon tamari, or soy sauce
  • 1 tablespoon pure maple syrup
  • ½ teaspoon salt
To complete the dish:
  • 1 sweet potato, chopped
  • 1 lb. assorted vegetables, chopped
  • 1 cup quinoa, rinsed
  • 2 cups water

Instructions
  1. To get started, combine the quinoa and water in a small saucepan over high heat, and bring it to a boil. Once boiling, cover the pot and reduce the heat to low, allowing the quinoa to cook for 15 minutes while you work on the curry sauce.
  2. In the meantime, melt the coconut oil in a 3-quart saute pan over medium heat, and saute the onions and garlic until tender, about 5 minutes. Add in the coconut milk, curry powder, tamari, maple syrup and salt and whisk well to combine. (Since curry powders can vary by brand, start with a smaller amount and add more to suit your tastes.)
  3. Adjust any other flavors as needed, then bring the sauce to a simmer and add in the chopped sweet potatoes. Cover the pan, and allow the sweet potatoes to steam in the sauce for 5 minutes. Finally, add the rest of the vegetables, toss in the sauce to coat, then cover and allow to steam until fork-tender.
  4. Fluff the cooked quinoa with a fork, then serve with a generous portion of the vegetables and curry sauce!

Notes
*When using canned coconut milk, I like to use this brand since it’s BPA-free. You can also make your own coconut milk, if you prefer, by blending together the water and meat of a fresh young Thai coconut. (The type with a shaved white exterior.) There’s no need to strain this type of homemade milk, since you want it thick like the canned version. One can of coconut milk is the equivalent of 1¾ cup fresh coconut milk.